This is a summary of the work of enabling UTVM to the Pynq-Z1 board and related issues. This work is based on the contents of the TinyML - How TVM is Taming Tiny,so if you want to reproduce the blog post you’ll need to firstly sync the TVM and microtvm-blogpost-eval repo back to something that was current around the time of the blog post,say ed2be308d2 and 490510d463.The original blog from @areusch et.al tested it good on STM32F746ZG.Since PYNQ has larger space and better performance I try to make it work on PYNQ-Z1.In general,the steps of make µTVM work on Pynq-Z1 is very similar to make it work on STM32F746ZG,because they have the same program framework.Therefore, before enabling µTVM on pynq-z1 board according to this article, it is best that you have set up the relevant environment according to the instructions in the microtvm-blogpost-eval repo and have successfully make µTVM work on STM32F746ZG board.However,some configurations should also be modified,including:
1)writing related configuration files to enable GDB debugging on pynq by openocd
2)editing the Settings of the development board
3)editing the configuration of the timer resources on the board
4)fixing some minor issues during debugging.
The whole process will be explained in detail below.
Specific steps
1.Writing openocd configuration file for communication
In the 0.10.0 version of OpenOCD, only support for Zynq-7000 chip was officially provided, so I wrote relevant configuration files to support the Pynq board (pynqz1.cfg) and the JTAG interface on the board(digilent_jtag_smt3.cfg),and added them into related path({your_openocd_root_path}/board and {your_openocd_root_path}/interface/ftdi).After that,I modify env-config.json in the microtvm-blogpost-eval repo and fill in the correct pynq path:
source [find board/pynq-z1.cfg]
Besides,it is needed to replace connect_assert_srst with connect_deassert_srst since the former command is not available for pynq.
At this point,you can test new files by running following command:
python -m micro_eval.bin.eval cifar10_cnn:micro_dev
Once you see INFO device_util.py:165 openocd.0: preceding log line marked the process healthy; log level is now DEBUG on the console, you can press Ctrl+C. And you know the communication is successfully established.
2.Modifying configuration file about bare board
There is only support for stm32f746 board in TVM repo,so we have to edit some settings to make it suitable for pynq,here’s the detail:
1)change DEVICE_ID in stm32f746xx.py to “arm.pynq-z1”
2)change BASE_ADDR and AVAILABLE_MEM in stm32f746xx.py to proper value.Luckily,these two arguments could remain unchanged according to pynq memory map sometimes.
3)change “-mcpu=cortex-m7” to “-mcpu=cortex-a9”
4)change “-mfpu=fpv5-sp-d16” to “-mfpu=vfpv3”
5)change “-mthumb” to “-marm”
6)add “-I{}/include”.format(os.environ[“XILINX_PATH”]) after “-I{}/Core/Include”.format(os.environ[“CMSIS_ST_PATH”]),so that we can import header files which are needed when deploying the on-board timer.
7)disable “thumb_mode” in function “generate_config”,since pynq uses Arm instruction set by default.
After modifying,your new file should be saved as pynqz1.py in the same directory with stm32f746xx.py.Besides,you should also edit init.py in related directory , import path and function name in eval.py to make sure new file could be imported and function could be called.For specific source code please see this repo.
The complete path of stm32f746xx.py is:
{your_TVM_root_path}\python\tvm\micro\device\arm\stm32f746xx.py
The complete path of eval.py is:
{your_microtvm-blogpost-eval_root_path}\python\micro_eval\bin\eval.py
3.Writing on-board timer configuration file for timing
In order to evaluate µTVM performance precisely,that is,acquiring the actual running time on board,we need to enable an on-board timer for timing.However,there is only sample programfor stm32f746 board timer in TVM repo,so I make a new directory,which contains utvm_timer.c and utvm_init.s, for pynq-z1 names “pynq-z1” in path “{tvm_root_path}/src/runtime/device/arm/” .In utvm_timer.c I refer to stm32f746 board timer file and define the way to manipulate on-board timer,and make the functions can be called in main program.For specific source code please see this repo.It is worth mentioning that a lot of header files are quoted during this process,all the files are stored in “XILINX_PATH”,and are included at compile time.The definition of “XILINX_PATH” is in python/micro_eval/util/init.py:
XILINX_PATH=f’{get_repo_root()}/3rdparty/zynqtimer’
4.Selecting proper memory space for program
4.1Using OCM Space
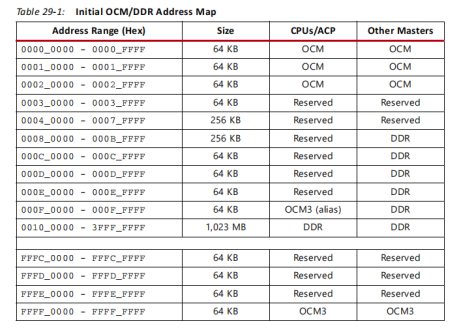
According to pynq memory map,the on-chip memory (OCM) module contains 256 KB of visible but incoherent RAM.In order to make full use of limited space,we could relocate OCM according to Zynq-7000-TRM:

we can write the code according to this table:
mww 0xF8000008 0x0000DF0D
mww 0xF8000910 0x1F
mdw 0xF8000910
mdw 0xFFFC0300
If you add these code in microrpc-dev-config\openocd.cfg.template in the microtvm-blogpost-eval repo after resetting pynq,OCM address map will be coherent like this:

In this case,256KB OCM could be fully used.Therefore,if the model is smaller than 256KB,it can be stored and run on OCM without any extra configuration and fast,but if the model is bigger than the whole OCM,remap can’t fix this issue,then we have to turn to DDR space.However,remap is invalid after resetting,so you must make sure there is no reboot operation during the runtime.That is delete these codes in {your_TVM_root_path}\src\runtime\micro\openocd_low_level_device.cc line 48:
socket_.cmd_builder() << "reset run";

socket_.SendCommand();
In this situation BASE_ADDR should be set to 0xFFFC0000 and AVAILABLE_MEM should be set to 256000.
4.2Using DDR Space(Recommended)
According to pynq memory map,there is about 1GB DDR space from 0x00100000 to 0x3fffffff available on the board.But it isn’t accessible unless we program ZYNQ processing system on the board.The easiest way to do it is using Vivado and Xilinx SDK.Those who are familiar with pynq are not unfamiliar with these two tools.For specific steps you can refer to this page,but in this way,you have to program the system every time you restart the board,and make sure there is no reboot operation during the runtime.A better choice is Creating a Zynq Boot Image and program it on pynq flash.For specific steps you can refer to this page or this blog.After doing this and set the JP4 jumper to QSPI mode,your board will load ZYNQ processing system automatically (LD12 shine green) after power on.Then,you can make use of 1GB DDR area.
In this situation BASE_ADDR and AVAILABLE_MEM could remain unchanged,that is BASE_ADDR=0x20000000 and AVAILABLE_MEM=320000.
Problems and solutions
Due to the difference between pynq and stm32f746 ,it’s easy for the system to fail. Here I’ve listed some of the problems I have run into, and how to solve them.
1.target not halted
Sometimes you may see the warning massage in your terminal like:
WARNING device_util.py:159 openocd.0: [stderr] Warn : target not halted
That is because the halt operation failed and board is running when program wants to write or read data on it.You need to modify all “socket_.cmd_builder() << “halt 0”;” to “socket_.cmd_builder() << “halt 500”;” in {your_TVM_root_path}\src\runtime\micro\openocd_low_level_device.cc .This can increase waiting time to 0.5s rather than less than 1ms until the board halted.
2.linking problem after changing compile arguments
In our new file pynqz1.py we have change “-mcpu=cortex-m7” to “-mcpu=cortex-a9”,and gcc-arm-none-eabi may not support floating point arithmetic on this cpu,so the program may fail when linking {your_TVM_root_path}\src\runtime\micro\host_driven\utvm_runtime.c for undefined reference to ‘__aeabi_uidivomd‘.The easiest way to fix this is modify related code in this C file. We can change
if (((uint32_t)utvm_workspace_start) % utvm_word_size) {
in line 64 to
if ((uint32_t)utvm_workspace_start&(utvm_word_size-1)){
and change
size_t alloc_size_words = (alloc_requested_bytes + utvm_word_size - 1) / utvm_word_size;
In line 122 to
size_t tmp=alloc_requested_bytes; size_t alloc_size_words =0; while(tmp>0) { tmp=tmp-utvm_word_size; alloc_size_words=alloc_size_words+1; }
By doing this,we can avoid division floating point arithmetic,so that the program will stay healthy. Actually,you are able to include libgcc.a when link utvm_runtime.c by adding the path of this lib in compile command in {your_TVM_root_path}\python\tvm\contrib\binutil.py.It can also solve the problem.However,adding this file in your program may take up more space especially when running it on board,so I recommend you simply change several lines to avoid this issue.
3.Writing for too long time
When I ran the program on pynq,I found a large amount of time was spend on communication with the board.After debugging,I realized it’s very inefficient to read and write in bytes,so I modify some code in function “Write” of {your_TVM_root_path}\src\runtime\micro\openocd_low_level_device.cc.I write 4 bytes instead of 1 byte a time,and reduce the process time from more than half an hour to less than three minutes.This work is related to several commands of openocd,and for specific code please see openocd_low_level_device.cc in this repo.
It should be noted that only heap and segment after it could be written 4 bytes a time or the process would stuck on board.Therefore I add a new global argument in {your_TVM_root_path}\src\runtime\micro\micro_session.cc to transfer heap start address to openocd_low_level_device.cc.If current pointer is pointed to address that is larger than heap start address then we write 4 bytes a time,or we write 1 byte a time.However the argument which represents address is a variable of class TargetPtr.We cannot compare the size with the instance of this class,so I add:
bool operator>=(size_t n) { return ((size_t)value_.uint64() > n||(size_t)value_.uint64() == n); }
In {your_TVM_root_path}\src\runtime\micro\micro_common.h line 182.Then the address is comparable and final related code in openocd_low_level_device.cc looks like:
void Write(TargetPtr addr, const void* buf, size_t num_bytes) override { if (num_bytes == 0) { return; }
// Check if we need to chunk this write request.

if (num_bytes > kMemTransferLimit) {
  const char* curr_buf_ptr = reinterpret_cast<const char*>(buf);
  while (num_bytes != 0) {
    size_t amount_to_write;
    if (num_bytes > kMemTransferLimit) {
      amount_to_write = kMemTransferLimit;
    } else {
      amount_to_write = num_bytes;
    }
    Write(addr, reinterpret_cast<const void*>(curr_buf_ptr), amount_to_write);
    addr += amount_to_write;
    curr_buf_ptr += amount_to_write;
    num_bytes -= amount_to_write;
  }
  return;
}

// Clear `input` array.
socket_.cmd_builder() << "array unset input";
socket_.SendCommand();
// Build a command to set the value of `input`.
{
  std::ostringstream& cmd_builder = socket_.cmd_builder();
  cmd_builder << "array set input {";
  const char* char_buf = reinterpret_cast<const char*>(buf);

  if(addr>=(size_t)heap_address)// heap_address is imported from micro_session.cc
  {
   for (size_t i = 0; i < num_bytes/4; i++) {
    // In a Tcl `array set` commmand, we need to pair the array indices with
    // their values.
    cmd_builder << i << " ";
    // Need to cast to uint, so the number representation of `buf[i]` is
    // printed, and not the ASCII representation.
    cmd_builder << ((static_cast<uint32_t>(char_buf[i])&0xff)+(static_cast<uint32_t>(char_buf[i+1])&0xff)*0x100+(static_cast<uint32_t>(char_buf[i+2])&0xff)*0x10000+(static_cast<uint32_t>(char_buf[i+3])&0xff)*0x1000000)<< " ";
  }
  }

  else
  {

  for (size_t i = 0; i < num_bytes; i++) {
    // In a Tcl `array set` commmand, we need to pair the array indices with
    // their values.
    cmd_builder << i << " ";
    // Need to cast to uint, so the number representation of `buf[i]` is
    // printed, and not the ASCII representation.
    cmd_builder << (static_cast<uint32_t>(char_buf[i])&0xff) << " ";
    //LOG(INFO) << "char_buf:" <<static_cast<uint32_t>(char_buf[i]);
  }
  }
  cmd_builder << "}";
  socket_.SendCommand();
}

{
 if(addr>=(size_t)heap_address)
  {
  socket_.cmd_builder() << "array2mem input"
                        << " " << std::dec << 32 << " " << addr.cast_to<void*>() << " "
                        << std::dec << num_bytes/4;
  socket_.SendCommand();
  }

 else
  {
  socket_.cmd_builder() << "array2mem input"
                        << " " << std::dec << kWordSize << " " << addr.cast_to<void*>() << " "
                        << std::dec << num_bytes;
  socket_.SendCommand();
  }
}
}
Result(Using DDR space)
INFO eval.py:202 got prediction after 173.553 ms: {‘label’: array([ -77, -42, -94, 87, -53, 92, -4, -47, -103, -46], dtype=int8)}
INFO eval.py:202 got prediction after 173.553 ms: {‘label’: array([ 124, -30, 11, 101, -104, -55, 29, -74, 10, 125], dtype=int8)}
INFO eval.py:202 got prediction after 173.554 ms: {‘label’: array([-117, -66, -71, -3, -32, 111, 46, -1, -128, -40], dtype=int8)}
The untuned model spends about 170ms,and Micro TVM is available on PYNQ-Z1.(Currently,pynq doesn’t support autoTVM)
Ending
All TVM repo files which are modified are listed in this repo,if you want to reproduce this blog post you can simply replace original files in TVM repo with these new files to reduce your workload,or you can directly download the modified microtvm-blogpost-eval repo and the modified TVM repo as well.
Mike